Archive | icing/frosting RSS feed for this section

Ice Cream Sundae Cupcakes

22 Apr

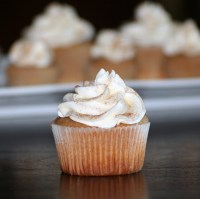
How cute are ice cream sundae cupcakes?  I was looking for something simple, but a little different recently for a coworkers birthday and I decided to make a variation of ice cream sundae cupcakes.  The main variation is that I didn’t include cherries on top, though that would have made them look significantly more like sundaes.  My reasoning – coworker isn’t a fan so why would I do that?!  Considering I do not like cherries I wasn’t too heartbroken 🙂

Ice Cream Sundae Cupcakes

Ingredients:
For the Cupcakes
2¼ cups cake flour (9 ounces), plus more for dusting the pans
1 cup + 2 tablespoons whole milk, at room temperature
6 large egg whites (¾ cup), at room temperature
2 teaspoons almond extract
1 teaspoon vanilla extract
1½ cups + 2 tablespoons granulated sugar (11.35 ounces)
4 teaspoons baking powder
1 teaspoon table salt
12 tablespoons unsalted butter (1½ sticks), softened but still cool

For the Frosting
3 sticks (1 1/2 cups) unsalted butter, room temperature
1 pound (4 cups) powdered sugar, sifted
1/2 teaspoon vanilla extract

For the Ganache
1 bag good quality milk chocolate chips

Directions:
For the Cupcakes
Set oven rack in middle position.  Heat oven to 350 degrees. Line cupcake wells with cupcake liners.

Pour milk, egg whites, and extracts into 2-cup glass measure, and mix with fork until blended.

Mix cake flour, sugar, baking powder, and salt in bowl of electric mixer at slow speed. Add butter; continue beating at slow speed until mixture resembles moist crumbs, with no powdery streaks remaining.

Add all but ½ cup of milk mixture to crumbs and beat at medium speed (or high speed if using handheld mixer) for 1½ minutes. Add remaining ½ cup of milk mixture and beat 30 seconds more. Stop mixer and scrape sides of bowl. Return mixer to medium (or high) speed and beat 20 seconds longer.

Divide batter evenly between cupcake wells, about 2/3 full.  Arrange pans at least 3 inches from the oven walls and 3 inches apart. (If oven is small, place pans on separate racks in staggered fashion to allow for air circulation.) Bake until thin skewer or toothpick inserted in the center comes out clean, 23 to 25 minutes for full size cupcakes (15-18 for mini cupcakes)

Let cakes rest in pans for 3 minutes before removing and leaving to cool on wire racks.

 For the frosting
With an electric mixer, beat butter on medium-high speed until pale and creamy, about 2 minutes.

Reduce speed to medium and add the sugar, 1/2 cup at a time, beating well after each addition and scraping down sides of bowl as needed.  After every two additions, raise speed to high and beat 10 seconds to aerate frostong, then return to medium.

Add vanilla, and beat until frosting is smooth.

For the Ganache

Melt chocolate chips on medium power in a microwave safe bowl, stirring every 30 seconds until completely melted.

For assembly

Top the center of each cooled cupcake with about 3/4-1 tablespoon melted chocolate, allowing to spread a little before topping with frosting.  To frost use a pastry bag with a large round opening tip, such as Wilton #1A.  Garnish with sprinkles, chopped nuts, cherries, etc. as desired.

Sources: Cupcakes – adapted from The Way the Cookie Crumbles    Frosting – Martha Stewart Cupcakes   Ganache – original “recipe”

Cinnamon Spice Cheesecake Layer Cake

16 Dec

When looking for cheesecake ideas online, I stumbled across this delicious looking cheesecake on Erin’s Food Files.  A red velvet cake with a NY Cheesecake middle layer!  I immediately wanted to make it knowing it would impress, however I was not feeling Red Velvet.  Knowing that the holidays were right around the corner and that I had a few Red Velvet desserts planned, I decided to switch up the cake, using the same basic idea overall though.  I love cinnamon flavors, especially this time of year so I looked for a Cinnamon Spice cake that would pair well with a cheesecake middle layer.

Once finding the recipe I wanted to go with I was so excited to try this cake out.  Disappoint it did not!  Although the picture above is not fantastic (I didn’t have time to take any pictures before serving, and this was the one last slice leftover for Rob and I to share – which I dropped) I couldn’t wait to share this fantasticness with my friends and readers.  Two (well, three with the frosting) relatively simple recipes combined to make one show-stopping dessert.

Cinnamon Spice Cheesecake Layer Cake
Ingredients:
For the cheesecake:
20 oz. cream cheese, room temperature
3/4 cup sugar
1/2 teaspoon finely grated lemon zest, plus 1/2 tablespoon fresh lemon juice
1/4 teaspoon coarse salt
2 large eggs
1/2 cup sour cream

For the cake:
1 1/2 sticks unsalted butter, softened, plus more for buttering the parchment paper
1 1/2 cups all-purpose flour, plus more for dusting
1 cup cake flour
1 teaspoon baking soda
1 teaspoon baking powder
1 teaspoon cinnamon (original recipe calls for 3/4 teaspoon which wasn’t enough for me!)
1/2 teaspoon salt
1 1/2 cups sugar
3 large eggs, at room temperature
2 teaspoons pure vanilla extract
1 cup sour cream

For the frosting:
12 oz. cream cheese, softened
12 oz. butter, softened
1 1/2 teaspoon vanilla extract
3 cups powdered sugar

Directions:
For the cheesecake:
Preheat oven to 325 degrees.  Set a kettle of water to boil.  Using an electric mixer, beat cream cheese on medium until fluffy, scraping down side of bowl.  Gradually add sugar, beating until fluffy.  Beat in lemon zest and juice, and salt.  Beat in eggs, one at a time, scraping down side of bowl after each addition.  Beat in sour cream.

Cut parchment paper in a circle and line the bottom of the spring-form pan.  Wrap bottom half of the pan in foil.  Pour in filling; place in a roasting pan.  Pour in boiling water to come halfway up side of spring-form.  Bake until just set in center, about 45 minutes.  remove pan from water, let cool 20 minutes.  Run a pairing knife around  edge; let cool completely.  Cover; chill overnight.

For the cake:
Preheat oven to 350 degrees.  Butter two 9-inch round cake pans.  Line the bottoms with parchment paper and butter the paper.  Dust the pans with flour, tapping out the excess.

In a medium bowl, whisk the 1 1/2 cups of all-purpose flour with the cake flour, baking soda, baking powder, cinnamon and salt.  In a stand mixer fitted with a paddle attachment, beat the butter with sugar at medium speed until  fluffy, about 3 minutes.  Beat in the eggs and vanilla until incorporated.  In 3 alternating additions, add the dry ingredients and sour cream, scraping down the side of the bowl between additions.

Scrape the batter evenly into the prepared pans.  Bake the cakes on the lower and middle racks of the oven for about 30 minutes, until golden and springy and the edges begin to pull away from the sides of the pan.  Transfer the cakes to racks and let cool for 15 minutes, then turn the cakes out and let them cool completely. Remove the parchment paper.

For the frosting:
Beat cream cheese, butter and vanilla together in a large bowl with an electric mixer until combined.  Add sugar and beat until frosting is light and fluffy, 5-7 minutes.

For assembly:
Place bottom layer on cake stand.  remove cheesecake from pan and remove metal bottom and parchment paper.  Place cheesecake layer on the top of the bottom layer of the cake.  If the cheesecake is wider than the cake, trim it with a knife.

Place top layer of cake on top of the cheesecake.  Coat with a generous layer frosting to act as the crumb coat.  Refrigerate about 30 minutes then frost with as much of the remaining frosting as desired.  Top with garnish of your choice.  I sprinkled cinnamon over the top, and lined the bottom with cinnamon sticks.

Refrigerate until ready to serve.  The cake does not have to be kept in the fridge until immediately before serving.  It’s OK to sit out a bit!

Sources:
Cheesecake, Frosting, Concept: Erin’s Food Files, originally adapted from Apple a Day and Martha Stewart 
Cinnamon Cake: Food and Wine

Vanilla Bean Buttercream

12 Aug


In my opinion, one of the best frosting recipes to have in your repertoire is a Vanilla Bean Buttercream. It’s sweet, buttery, full of flavor and goes well with almost any cupcake or cake flavor. I am a huge fan of Vanilla Bean Buttercream on nearly any cupcake, however most recently I became addicted to these Snickerdoodle Cupcakes, of which I frosted with Vanilla Bean Buttercream.  This recipe is as easy as they come, and as soon as you taste it you’ll be hooked!


Easy Vanilla Bean Buttercream

Ingredients:

2½ sticks unsalted butter, softened
1 vanilla bean, halved lengthwise
2½ cups confectioners’ sugar (10 ounces)
Pinch salt
1 teaspoon vanilla extract
2 Tablespoons heavy cream

Directions:

In a standing mixer fitted with the whisk attachment, beat the butter at medium-high speed until smooth, about 20 seconds. Using a paring knife, scrape seeds from vanilla bean into butter and beat mixture at medium-high speed to combine, about 15 seconds.

Add confectioners’ sugar and salt; beat at medium-low speed until most of the sugar is moistened, about 1 minute. Scrape down the bowl and beat at medium speed until mixture is fully incorporated, about 30 seconds; scrape bowl, add vanilla and heavy cream, and beat at medium speed until incorporated, about 20 seconds, then increase speed to medium-high and beat until light and fluffy, about 4 minutes, scraping down bowl once or twice.


Source: Brown Eyed Baker

Cookie Dough Cupcakes

6 Aug


I have to admit something – I’m not a huge sweets person.  Coming from someone that loves to bake that may sound a bit odd, but honestly, my favorite part of baking is sampling the doughs and batters.  Though I’m not much of a sweets person I do love (and I stress love) to lick the beater, spatula, etc. before everything goes in the oven.  And, it just doesn’t get much better than snagging some delicious chocolate chip cookie dough straight from the bowl.  


As soon as I saw these cupcakes on Annie’s Eats I knew I wouldn’t be able to resist them too long.  Cookie Dough batter, filled with cookie dough, and then still topped with a cookie dough flavored butter cream?!  Hello lover!  I knew that I would have to make these with the specific intent to giveaway, or for a large crowd, because I would be too tempted to eat all of the batter myself.


Of course, though I don’t eat a lot of sweets, I still always eat some of everything I make.  I am so glad I tried one of these cupcakes.  OH SO GOOD!!!  Decadent, sweet, moist, rich… the adjectives go on.


Cookie Dough Cupcakes 

Ingredients:

For the cupcakes:

3 sticks unsalted butter, at room temperature
1½ cups light brown sugar, packed
4 large eggs
2 2/3 cups all-purpose flour
1 tsp. baking powder
1 tsp. baking soda
¼ tsp. salt
1 cup milk
2 tsp. vanilla extract
1 cup chocolate chips (semisweet or bittersweet)


For the filling:
4 tbsp. unsalted butter, at room temperature
6 tbsp. light brown sugar, packed
1 cup plus 2 tbsp. all-purpose flour
7 oz. sweetened condensed milk
½ tsp. vanilla extract
¼ cup mini semisweet chocolate chips

For the frosting:

3 sticks unsalted butter, at room temperature
¾ cup light brown sugar, packed
3½ cups confectioners’ sugar
1 cup all-purpose flour
¾ tsp. salt
3 tbsp. milk
2½ tsp. vanilla extract

Directions:
To make the cupcakes, preheat the oven to 350° F.  Line two cupcake pans with paper liners (24 total).  In the bowl of a stand mixer fitted with the paddle attachment, combine the butter and brown sugar.  Beat together on medium-high speed until light and fluffy, about 3 minutes.  Mix in the eggs one at a time, beating well after each addition and scraping down the sides of the bowl as needed.

Combine the flour, baking powder, baking soda, and salt in a medium bowl.  Stir together to blend.  Add the dry ingredients to the mixer bowl on low speed, alternating with the milk, beginning and ending with the dry ingredients, mixing each addition just until incorporated.  Blend in the vanilla.  Fold in the chocolate chips with a spatula.

Divide the batter evenly between the prepared cupcake liners.   Bake for 18-20 minutes, until a toothpick inserted in the center comes out clean.  Allow to cool in the pan 5-10 minutes, then transfer to a wire rack to cool completely.

To make the cookie dough filling, combine the butter and sugar in a mixing bowl and cream on medium-high speed until light and fluffy, about 2 minutes.  Beat in the flour, sweetened condensed milk and vanilla until incorporated and smooth.  Stir in the chocolate chips.  Cover with plastic wrap and refrigerate until the mixture has firmed up a bit, about an hour.

To fill the cupcakes, cut a cone-shaped portion out of the center of each cupcake.  Fill each hole with a chunk of the chilled cookie dough mixture.

To make the frosting, beat together the butter and brown sugar in the bowl of a stand mixer fitted with the paddle attachment until creamy.  Mix in the confectioners’ sugar until smooth.  Beat in the flour and salt.  Mix in the milk and vanilla extract until smooth and well blended.

Frost the filled cupcakes as desired, sprinkling with mini chocolate chips and topping with mini chocolate chip cookies for decoration.


Source: Annie’s Eats

Pink Lemonade Cupcakes

10 May


I have had two recipes/ideas I’ve been wanting to try for-ev-er, and the chance finally came.  I have seen a few blogs with Pink Lemonade Cupcakes that I’ve been wanting to make probably since not too long after getting married (3 years ago).  Some have been made with a cake mix and some from scratch.  I have zero aversion to box mixes, especially considering I always have 2-3 in my pantry of basic flavors just in case, however I wanted to make these from scratch so that I could control how many I made as I didn’t need 24-30 like I normally get from a box.  Additionally, I’ve been wanting to decorate cupcakes with butterflies, ala “Hello, Cupcake!”.  I thought these butterflies would be adorable on Pink Lemonade cupcakes – perfect for spring/summer time.  I don’t have the “Hello, Cupcake!” book, however Annie over at Annie’s Eats has a great tutorial on how to make these cuties yourself. 

These cupcakes were a hit.  The flavor was great – sweet, but lemony, and not over powering.  Plus who wouldn’t love the butterflies!?  


Pink Lemonade Cupcakes
Ingredients:
2 c. all-purpose flour
1 tsp. baking powder
1/2 tsp. baking soda
Pinch salt
1 c. granulated sugar
1/2 c. vegetable oil
4 egg whites
2/3 c. thawed frozen Pink Lemonade Concentrate
1/2 c. buttermilk
Pink food coloring

Directions: Preheat oven to 350F. Line muffin pan with liners. In a small bowl, combine flour, baking powder, baking soda and salt. Set aside.

In a large bowl, whisk together sugar, oil, egg whites and lemonade concentrate. Alternately whisk in flour mixture and buttermilk, making three additions of flour mixture and two of buttermilk, beating until just smooth.

Add just enough food coloring to turn the batter a light shade of pink.

Scoop batter into liners (fill about three-fourths full). Bake in preheated oven for 20-25 minutes or until tops of cupcakes spring back when lightly touched. Let cool in pan on rack for 10 minutes. Remove from pan and let cool completely on rack. Top cooled cupcakes with frosting (see below).
Lemonade Buttercream3 c. + 3 Tbsp. confectioner’s sugar
1 stick unsalted butter at room temperature
1/8 tsp. salt
2 Tbsp. pink lemonade concentrate
(Milk to reach desired consistency)Yellow food coloring

Add the butter, confectioner’s sugar, salt, lemonade concentrate, and a few drops of food coloring to the stand mixer and mix on low using the paddle attachment until combined.

Turn the speed to med-high until the buttercream is fluffy and uniformly yellow. Pipe or spread onto cooled cupcakes.


Source: Recipe adapted from Beantown Baker


Butterflies from Annie’s Eats and Hello, Cupcake!

White Chocolate Cheesecake Mousse Filling

19 Apr

OK, so, while this recipe was the result of me literally quick thinking at the grocery store rushing around to pick up a few ingredients over Easter weekend, I came up with a fantastic cake filling, in my humble opinion.  I love the cake fillings at Costco and wanted to make a variation on that.  This is really semi-homemade but oh so good!  It’s rich, creamy and decadent.  Even my husband loved it, and he’s not really a cake fan.  It was so easy to make too!

White Chocolate Cheesecake Mousse Filling
Ingredients:
1 package Jello Pudding – Cheesecake flavor
1 8-oz. container Whipped Cream Cheese, softened
1 8-oz, container Cool Whip, thawed
3 oz. White Chocolate, melted
1 teaspoon vanilla

Directions:
Beat softened cream cheese and vanilla with mixer until well blended and light (a few minutes).

Beat in pudding mix until fully incorporated.

Stir in melted white chocolate.

Fold in thawed Cool Whip

Allow to set in fridge for a few hours, but don’t let it get too cold that it’s hard to spread between cake layers.

Marshmallow Fondant

12 Apr

I’ve been wanting to decorate a cake with fondant for such a long time, but I’ve been completely intimidated.  Not only was I intimidated by the actual act of rolling and using the fondant, I knew I wanted to make my own because store bought fondant doesn’t have the best taste in the world so I was a little nervous about the whole ordeal.  With the exception of one mistake on my part making and decorating with fondant proved to be SO EASY for me.  Really, you just need 3-4 simple ingredients and that’s all so honestly I’m not so sure why I was freaking out.  
All of the recipes, blog posts, etc. that I’d read said to make sure to liberally grease your hands and counter top with Vegetable Shortening before kneading and rolling out the fondant.  Well, I guess my definition of liberal wasn’t enough so that was my one minor error.  The fondant was sticking to the counter top something crazy.  I did end up greasing over the stuck fondant, basically saying “ah, whatever” and that seemed to work.  Because of my {brilliance} cleanup wasn’t too easy, but now I know for future reference! 
I did decide that my first foray in to fondant should be simple, and I opted to cover the cake I was decorating in buttercream and decorate with fondant cutouts.  Rolling out the fondant and cutting it was as easy as sugar cookies, only without baking!  Tinting the fondant wasn’t too difficult either – which is another thing I was nervous about.  I just thought because of how stiff fondant can be I would have a rough time kneading the coloring in but it really wasn’t any more difficult that kneading the fondant to begin with.  
Now that I know I’m not inept at fondant next I need to try decorating the whole cake with fondant!  Off to look for an excuse now….


Marshmallow Fondant
Ingredients:
1 package (16 ounces) white mini marshmallows (use a good quality brand)
2-5 tablespoons water
2 pounds (about 8 cups) sifted confectioners’ sugar
1/2 cup solid vegetable shortening
Makes: About 2 pounds marshmallow fondant

Instructions:
Place marshmallows and 2 tablespoons of water in a microwave-safe bowl. Microwave 30 seconds on high; stir until mixed well. Continue microwaving 30 seconds more; stir again. Continue until melted (about 2 1/2 minutes).

Place 3/4 of the confectioners’ sugar on top of the melted marshmallow mixture. Fold sugar into marshmallow mixture. Flavoring can be added at this point if desired.

Place solid vegetable shortening in easily accessed bowl so you can reach into it with fingers as you are working. Grease hands and counter GENEROUSLY; turn marshmallow mixture onto counter. Start kneading like you would dough. Continue kneading, adding additional confectioners’ sugar and re-greasing hands and counter so the fondant doesn’t stick. If the marshmallow fondant is tearing easily, it is too dry; add water (about 1/2 tablespoon at a time) kneading until fondant forms a firm, smooth elastic ball that will stretch without tearing, about 8 minutes.

It’s best to allow Marshmallow Fondant to sit, double-wrapped, overnight. Prepare the fondant for storing by coating with a thin layer of solid vegetable shortening, wrap in plastic wrap and then place in resealable bag. Squeeze out as much air as possible. Marshmallow Fondant will keep well in refrigerator for several weeks.

When not working with fondant, make sure to keep it covered with plastic wrap or in a bag to prevent it from drying out. When ready to use, knead fondant until smooth. Roll out fondant 1/8 in. thick.

To color fondant: If you need to tint the entire batch of fondant, add a little icing color to the melted marshmallow mixture before adding confectioners’ sugar. For smaller amounts of tinted fondant, add icing color to portions of fondant as needed.

** A lot of people have asked me how I got the vibrant buttercream frosting color – I used a mixture of Wilton Color Gels in Leaf Green and Sky Blue.  The color is PERFECT for fun spring and summer cakes and would be AWESOME for shower cakes of any kind.  I love bright and fun over pastel if given the opportunity!

Source: Wilton

Hershey’s Perfectly Chocolate Cake & Frosting

6 Apr

I’m not the world’s biggest chocolate fan (what?!  A woman that doesn’t live and breathe for chocolate?!  Lies!) but I know that most people like chocolate so therefore, yes, I do bake chocolate desserts when the time calls for it.  A lot of times I will just take someone’s word for it regarding a chocolate dish, but I couldn’t help but try this because it’s supposed to be the perfect chocolate cake and the way I look at it is that you’ve gotta taste perfection, right?!  As someone that’s not a huge fan of chocolate let me just tell you not to take my word for it – you’ve gotta try this to believe it.  This cake was amazing – dare I say perfect?!  It was deliciously moist and still rich, just like you want your chocolate to be.

Hershey’s Perfectly Chocolate Cake

Ingredients:
2 cups sugar
1-3/4 cups all-purpose flour
3/4 cup HERSHEY’S Cocoa
1-1/2 teaspoons baking powder
1-1/2 teaspoons baking soda
1 teaspoon salt
2 eggs
1 cup milk
1/2 cup vegetable oil
2 teaspoons vanilla extract
1 cup boiling water

Directions:
Heat oven to 350°F.  Line muffin tins with baking cups. 

Stir together sugar, flour, cocoa, baking powder, baking soda and salt in large bowl. Add eggs, milk, oil and vanilla; beat on medium speed of mixer 2 minutes. Stir in boiling water (batter will be thin). Fill cups 2/3 full with batter. 

Bake 22 – 25 minutes or until wooden pick inserted in center comes out clean. Cool completely and frost as desired. 

Yields about 30 cupcakes.

Hershey’s “Perfectly Chocolate” Chocolate Frosting

Ingredients:
1/2 cup (1 stick) butter or margarine
2/3 cup HERSHEY’S Cocoa
3 cups powdered sugar
1/3 cup milk
1 teaspoon vanilla extract

Directions:
Melt butter. Stir in cocoa. Alternately add powdered sugar and milk, beating to spreading consistency. Add small amount additional milk, if needed. Stir in vanilla.

Yields 2 cups frosting – I made 1 1/2 of the recipe to ensure enough to frost cupcakes (about 3 cups frosting)

Source: Hershey’s

Bachelorette Party Cookies

22 May

I’ve never really decorated with royal icing before and it kinda shows! I made some “butt cookies” for my sister-in-law’s bachelorette party a few weekends ago and while they were adorable I wish this wasn’t the first time decorating cookies with royal icing. Oh well – you gotta learn sometime! It’s not that it was hard but I also think trying so many colors (I think 6 in the end) was too much for a first timer – I was stressing about the mess! Next time I’ll just make sure to be totally prepared!


To get the “butt” shape
– roll cookie dough as normal and use a HEART cookie cutter. Cut the point of the cut cookie off with a sharp kinfe.

* I was also reminded that these could have been bra cookies as well!


Basic Royal Icing

Source: Wilton

Ingredients:
1 lb (4 c.), powdered sugar, sifted
3 Tbsp meringue powder
4-6 Tbsp water*
*the amount of water you will need to add to the icing is very much dependent on temperature and humidity of the place you are and the day you make it.

Note: All tools (mixer, bowl, spatula, paddle) must be completely free of any grease/fat or the icing will turn to water and you will have to start over.

Directions:

-In bowl of large stand mixer, fitted with paddle attachment, add powdered sugar, meringue powder, and 4 Tbsp water.

-Turn mixer on medium speed and slowly add more water as necessary for icing to just come together (about 1 more).

-Turn mixer on high and beat for 7-10 minutes, or until the sheen comes off of the icing.

-Use immediately and place a damp towel over any remaining icing – it dries quickly!

To Add Color:

In a small bowl, place some of your royal icing. Take a toothpick, swirl it in your gel coloring and pull out the amount of food coloring you’ll need. Place the toothpick end into the icing and swirl to incorporate the color into the icing. Use your spatula to mix the icing until the color is fully incorporated. If you need more color, use a new toothpick, as not to contaminate the food coloring.

To Decorate Cookies:
I recommend checking out Chelle’s site for instructions on how to decorate with Royal Icing. I tried and failed at writing down the directions because I was so unorganized when decorating the cookies!

White Chocolate Amaretto Cream Cake

6 Apr
I, along with the other bridesmaids, hosted a bridal shower for my sister-in-law yesterday afternoon. We split the responsibilities and as always I offered to bake the cake. My mom had made this cake for a birthday party for my dad, husband and I (our birthdays are all close on the calendar) and it was AMAZING. I knew I had to find an excuse to make it. In addition to the cake the rest of the dessert was a chocolate fountain with Strawberries, marshmallows, pretzel sticks and angel food cake.

White Chocolate Amaretto Cream Cake
Source: Dierbergs’ Everybody Cooks
Ingredients
1 ½ cups milk (divided)
3 oz. White chocolate, chopped
2 ¾ cups cake flour
2 teaspoons baking powder
½ teaspoon salt
½ cup unsalted butter, softened
1 ½ cups sugar (divided)
4 eggs, separated
2 teaspoons vanilla extract
Amaretto Syrup (recipe below)
Almond Buttercream Frosting (recipe below)
White Chocolate Curls (optional)

Directions
– Lightly coat bottom and sides of three 9-inch round cake pans with no-stick cooking spray; set aside
– In 2-cup glass measure, combine ½ cup milk and the white chocolate. Microwave on high for 1 ½ minutes; stir. (if chocolate is not melted microwave on high for 30 seconds more; stir until smooth)
– Add remaining 1 cup milk; set aside to cool slightly
– Sift flour, baking powder and salt together on waxed paper; set aside.
– In large mixing bowl beat butter, 1 cup sugar, egg yolks and vanilla for 2 minutes until light and fluffy.
– With mixer at low-speed, alternately add dry ingredients and milk mixture to butter mixture.
– In medium bowl, using clean dry beaters, beat egg whites to soft peaks. Gradually beat in remaining ½ cup sugar until shiny but not dry.
– Fold whites in to cake batter in 2 additions.
– Pour batter evenly in to prepared pans
– Bake in 350 oven for 20 – 22 minutes or until wooden toothpick inserted in center comes out clean and sides being to pill away from edges.
– Cool cakes in pans for 5 minutes
– Invert cakes onto wire racks; cool completely
– Place one layer on serving platter and brush with amaretto syrup.
– Spread a thin layer of butter cream
– Top with second layer and repeat
– Top with final layer and syrup.
– Spread remaining frosting on sides and top of cake
– Garnish with white chocolate curls
– Store in fridge and bring to room temp to serve.

Amaretto Syrup
Ingredients
¼ cup sugar
¼ cup water
1 tablespoon Amaretto

Directions
– in a small saucepan, combine sugar and water and bring to a boil over medium-high heat.
– Reduce heat and simmer until reduce by half. Cool and stir in Amaretto

Almond Buttercream Frosting
Ingredients

8 egg whites
1 cup sugar
¾ pound (3 sticks) butter, softened
3 squares (1 oz. Each) white chocolate, melted and cooled slightly
3 tablespoons Amaretto

Directions
– In a heavy saucepan, whisk egg whites and sugar until very well blended.
– Place over medium-low heat, stirring constantly with whisk for 10-12 minutes or until mixture reaches 160 degrees.
– In a large bowl with mixer at high speed beat egg whites until stiff, shiny peaks form – about 5 minutes.
– Reduce speed to medium – add butter, 2 tablespoons at a time (mixture may appear slightly curdled at this time)
– Blend in white chocolate and Amaretto until mixture is very smooth and creamy.
– Spread over cake

TIP: To make white chocolate curls, warm a square in your hand. Draw a peeler across the bar to create curls. If chocolate shaves rather than curls it needs more warming. Curls can be made in advance and chilled until ready to use. Use a wooden pick to lift and apply finished curls to cake. (I did not use a toothpick – seemed too time consuming!)