Moving Back – Check out my new Site

1 Feb

If you’re still reading, you may notice that I haven’t blogged in awhile.  There is a reason for that, but rather than get in to my password issues, I just wanted to let you know that I’m moving back to Blogger, even though it’s considered “less than desirable” in the blogging world.  I’ve never had problems with Blogger, and unfortunately I cannot say that about wordpress, so I’m moving.  Additionally, I finally started working towards “branding” my blog!  I have a new domain name and eventually you’ll see a new, CUSTOM, design/template!

So, without further adieu, check out my new domain, and reset you’re readers and feeds!

http://www.coffeeandcannolis.com

Thanks,

Angie

Mom-to-be Margaritas (Mamaritas)

30 Apr

Just because an expectant mother can’t partake in drinking alcoholic beverages doesn’t mean she doesn’t want to enjoy the occasional mocktail to celebrate.  With Cinco de Mayo just around the corner a margarita sure sounds nice, but minus the tequilla of course!

A few months ago I bought a fantastic mocktail book – “Preggatini’s-Mixology for the Mom-to-be” and started making a few of the recipes recently.  The first I made was this Mamarita recipe for my sister-in-laws baby shower which had a Mexican food theme.  There was no need for the two of us to just drink water while everyone else was enjoying a margarita!  Sure, there was lemonade, but for anyone else that’s pregnant or has ever been – you get burnt out on lemonade REAL quick!!

While I prefer a real margarita, this was a good substitute to calm my craving for a few more months.  It is pretty sweet so it’s not something I’ll make on a regular basis, but I’ll definitely be making it again for Cinco de Mayo!  And, who knows- maybe this weather will pick a temperature to stick with and one day I may try this out frozen to see how that tastes!

Probably 95% of the recipes in the book are individual serving size recipes but they’re all easy to multiply to get as many servings as you desire.  Plus, another great thing about the book is that many of the recipes give tips on how to “de-virginize” the drink for dad and others not with child!

Mamaritas

Ingredients:
1 oz. agave nectar
1/2 oz. freshly squeezed lemon juice
1 oz. orange juice
3 oz. limeade
1 lime wheel
rimming salt (I omitted)

Directions:
(Rim a margarita glass and set aside)

Stir agave nectar and lemon juice in the bottom of a mixing bowl until nectar dissolves.  Add OJ, limeade, ice and shake vigorously.  Strain into the maragrita glass and serve with a lime wheel on the rim.

To make larger quantities, just multiply the ingredients by the number of servings desired.  Instead of shaking to mix, just stir vigorously.  Serve with or without ice.

Source: Preggatini’s: Mixology for the Mom-to-be

Ice Cream Sundae Cupcakes

22 Apr

How cute are ice cream sundae cupcakes?  I was looking for something simple, but a little different recently for a coworkers birthday and I decided to make a variation of ice cream sundae cupcakes.  The main variation is that I didn’t include cherries on top, though that would have made them look significantly more like sundaes.  My reasoning – coworker isn’t a fan so why would I do that?!  Considering I do not like cherries I wasn’t too heartbroken 🙂

Ice Cream Sundae Cupcakes

Ingredients:
For the Cupcakes
2¼ cups cake flour (9 ounces), plus more for dusting the pans
1 cup + 2 tablespoons whole milk, at room temperature
6 large egg whites (¾ cup), at room temperature
2 teaspoons almond extract
1 teaspoon vanilla extract
1½ cups + 2 tablespoons granulated sugar (11.35 ounces)
4 teaspoons baking powder
1 teaspoon table salt
12 tablespoons unsalted butter (1½ sticks), softened but still cool

For the Frosting
3 sticks (1 1/2 cups) unsalted butter, room temperature
1 pound (4 cups) powdered sugar, sifted
1/2 teaspoon vanilla extract

For the Ganache
1 bag good quality milk chocolate chips

Directions:
For the Cupcakes
Set oven rack in middle position.  Heat oven to 350 degrees. Line cupcake wells with cupcake liners.

Pour milk, egg whites, and extracts into 2-cup glass measure, and mix with fork until blended.

Mix cake flour, sugar, baking powder, and salt in bowl of electric mixer at slow speed. Add butter; continue beating at slow speed until mixture resembles moist crumbs, with no powdery streaks remaining.

Add all but ½ cup of milk mixture to crumbs and beat at medium speed (or high speed if using handheld mixer) for 1½ minutes. Add remaining ½ cup of milk mixture and beat 30 seconds more. Stop mixer and scrape sides of bowl. Return mixer to medium (or high) speed and beat 20 seconds longer.

Divide batter evenly between cupcake wells, about 2/3 full.  Arrange pans at least 3 inches from the oven walls and 3 inches apart. (If oven is small, place pans on separate racks in staggered fashion to allow for air circulation.) Bake until thin skewer or toothpick inserted in the center comes out clean, 23 to 25 minutes for full size cupcakes (15-18 for mini cupcakes)

Let cakes rest in pans for 3 minutes before removing and leaving to cool on wire racks.

 For the frosting
With an electric mixer, beat butter on medium-high speed until pale and creamy, about 2 minutes.

Reduce speed to medium and add the sugar, 1/2 cup at a time, beating well after each addition and scraping down sides of bowl as needed.  After every two additions, raise speed to high and beat 10 seconds to aerate frostong, then return to medium.

Add vanilla, and beat until frosting is smooth.

For the Ganache

Melt chocolate chips on medium power in a microwave safe bowl, stirring every 30 seconds until completely melted.

For assembly

Top the center of each cooled cupcake with about 3/4-1 tablespoon melted chocolate, allowing to spread a little before topping with frosting.  To frost use a pastry bag with a large round opening tip, such as Wilton #1A.  Garnish with sprinkles, chopped nuts, cherries, etc. as desired.

Sources: Cupcakes – adapted from The Way the Cookie Crumbles    Frosting – Martha Stewart Cupcakes   Ganache – original “recipe”

Beer Pizza Dough and a Foodbuzz/New Belgium Tastemaker Event

20 Apr

It’s no secret that I love cooking with beer, and ironically, one day while Rob and I were enjoying some beer cheddar risotto  I received an email, that I was able to check on my handy iPhone while eating, from Foodbuzz asking for submissions to be a Foodbuzz/New Belgium Brewing Company Tastemaker.  Yes please!  I didn’t expect to be selected as I’m sure numerous people submitted for the opportunity but lo and behold I was selected.

While debating what to make I couldn’t decide between a dessert or main course.  One day while craving pizza I had an inspiration that a pizza dough made with beer would be fantastic.   (But trust me, I have plenty of dessert ideas rattling in my brain to try out with beer!)  Knowing that I really wanted to take advantage of grilling season I chose a Spring seasonal beer (New Belgium Mighty Arrow Pale Ale) to complement and not overpower the pizza.  Plus, I wanted to grill the pizza (my favorite way to prepare pizza) and seasonal beers just go hand in hand with grilling, in my opinion.

Mother Nature finally decided to clear up enough to allow me to grill my pizza (though just barely as I was racing the clock trying to beat what turned in to a hail storm and tornado in the area).   The subtle flavor of the beer was fantastic, and though I didn’tget to enjoy a beer with the pizza (considering I’m almost 8 months pregnant) Rob did and he said the lighter beer really complemented the pizza, my exact expectation.

Considering I love to cook with beer I’m sure I’ll be trying this again with another beer (especially this summer when I can enjoy a beer to go with it) and I’m already thinking that Fat Tire Amber Ale would go great as well.   And, PS – Rob and I both agree that this dough would make great bread sticks!

Beer Pizza Dough

Ingredients:
2 1/2 cups AP flour
1 1/2  cups Semolina flour
1 teaspoon garlic powder
1 1/2 tablespoon Parmesan Cheese
2 teaspoons instant yeast
1 teaspoon salt
2 tablespoons olive oil
1 1/2 cups room-temperature New Belgium Mighty Arrow Pale Ale

Directions:

Mix and knead all ingredients until a smooth, soft dough ball is formed.

Cover the dough and allow to rise for 30 minutes –  2 hours.

Preheat grill to medium high heat.  Divide dough in to 2-4 equal sections, determined by how big you want your pizzas (I like grilling smaller pizzas so I divided in to 4 and froze 2!)
Shape each piece in to a thin round, size depending on how many pizzas you’re making.   Sprinkle a pizza peel or non-rimmed cookie sheet with Semolina flour and place each dough round on top.  Carefully place pizza dough on preheated grill and bake one side for 5 minutes or until lightly grilled.

Flip dough over and top grilled side with desired pizza toppings, such as sauce, cheese and meats/veggies.  Cover and finish grilling for about 8-10 minutes or until crust is cooked through and cheese is melted thoroughly.

Serve warm.
Source: adapted from King Arthur Flour

As part of the Foodbuzz Tastemakers program I will receive a stipened for participating in the New Belgium Brewing Company Tastemaker opportunity.  All opinions in this post are 100% mine and my husbands.

Lighter Loaded Potato Soup

4 Mar

Since it’s March I would love to say that the balmy, winter weather is over, but I know better than that.  Unfortunately March can be a cruel month, leading you to believe that the worst is over and Spring has sprung, but that’s not always the case.  March is definitely one of those months that you have to pay close attention to the weather because one day it can be close to 70, and the next, low 40s.

It’s always a good idea to have a few quick recipes ready to go for those days that the weather is just a little more balmy than  expected – such as a quick, filling soup.  I first saw this soup a few months ago in a Cooking Light my boss discarded in the magazine pile at work and I knew I needed to make it.  The problem is – I lost the magazine for a few months and couldn’t remember where I saw the recipe.  Upon finding it while cleaning I knew I immediately needed to make this recipe.  I love anything potatoes and I was gearing up for a chilly weekend, and Saturday afternoon alone, so I figured what better time to try it out then a quick weekend lunch.  I have never been so glad to actually make something for a weekend lunch!  Not only was it delicious then, it made for great leftovers for work since it’s always a little chilly in the office!  And, bonus – not too bad for you!  I’m not saying this was an uber-healthy meal, however as starchy soups go this was a light version that wasn’t light on flavor by any means!

Loaded Potato Soup
Ingredients:
2 lbs red potatoes
2 teaspoons olive oil
1/2 chopped onion
1 1/4 cups fat-free, lower-sodium chicken broth
3 tablespoons flour
2 cups 1% low-fat milk, divided
1/4 cup reduced-fat sour cream
1/2 teaspoon salt
1/4 teaspoon fresh ground black pepper
3 bacon slices
1/3 cup shredded cheddar cheese
4 teaspoons thinly sliced green onions

Directions:
Pierce potatoes with a fork. Microwave on HIGH 13 minutes or until tender. Cut in half; cool slightly.

While potatoes cook, heat oil in a large saucepan over medium-high heat. Add onion; sauté 3 minutes. Add broth. Combine flour and 1/2 cup milk in measuring cup; add to pan then add the remaining 1 1/2 cups milk. Bring to a boil; stir often, being careful to not let the milk boil over. Cook 1 minute. Remove from heat; stir in sour cream, salt, and pepper.

Arrange bacon on a paper towel on a microwave-safe plate. Cover with a paper towel; microwave on HIGH for 4 minutes. Crumble bacon.

Scoop potato into soup and discard potato skins. Coarsely mash potatoes into soup using a potato masher. Ladle soup into bowls and top with cheese, green onions, and bacon.

Source: Cooking Light, October 2010

Cookies and Cream Ice Cream

17 Feb

Ever since I made cookies & cream cupcakes I’ve been craving anything Oreo.  I do that though – as soon as I have a bite of anything Oreo or Cookies & Cream I need more.  Rather than just eat the leftover Oreo’s straight out of the packaging with a glass of cold milk I decided to actually make something with them.  The weather was starting to warm up so why not make Cookies & Cream Ice Cream to bring myself out of the funk this winter has brought on to most of us this year.

I’ve made Cookies & Cream Ice Cream with a basic vanilla ice cream base, just folding in some chopped Oreo’s but I decided this time to look for an actual recipe.  I’m glad I did because while my old version was good, this was much better.  It’s exactly what I look for in a Cookies & Cream Ice Cream.

Cookies and Cream Ice Cream
Ingredients:
1 cup whole milk
2 cups heavy whipping cream
6 egg yolks
1/2 cup sugar
1 tbsp. vanilla extract
15-20 Oreo cookies, coarsely chopped

Directions:
Combine the milk and cream in a saucepan over medium heat.  Heat until bubbles form around the edges.  In a medium bowl, whisk together the egg yolks and sugar until smooth and well combined.  Slowly add the warm milk mixture to the egg yolk mixture, whisking constantly to prevent curdling.

Pour the mixture back into the saucepan.   Cook over medium heat, stirring constantly, about 5-8 minutes, until the mixture is thickened and coats the back of a spoon (about 175 degrees F on an instant read thermometer).  Pour the liquid through a fine mesh sieve into a bowl.  Stir in the vanilla extract.  Cover with plastic wrap and chill in the refrigerator until completely chilled.

Once the mixture is well chilled, pour into an ice cream maker and freeze according to the manufacturer’s instructions.  Once the mixture is softly frozen, transfer half of it to a storage container.  Add half of the chopped Oreo pieces and fold in gently with a rubber spatula.  Add the remaining ice cream and Oreo pieces to the container, and fold once more until the mixture is evenly combined.  Freeze until completely hardened.

Source: As Seen onAnnie’s Eats, adapted from Pennies on a Platter

Funfetti Cookies

12 Feb

Though I love to bake from scratch, sometimes it is so worth it to bake semi-homemade style.  These funfetti cookies are a testament to that.  Funfetti cookies, a step-sibling to the adorable funfetti cakes, have always been a staple for my family, but surprisingly I realized this last Christmas that Rob has never had one that he can recall.  Granted, my mother-in-law doesn’t bake much, but this is definitely her kind of baking so I couldn’t get over the fact that he claims she never made these for him.

With the urge to bake something quick and easy that I knew Rob would love, nothing was appealing to me (that would appeal to him).  That is – until I was making the turn to head to the check-out at the grocery store last weekend.  Right in front of me was a huge Valentine’s Day candy display, along with boxes of Valentine’s Day themed funfetti cake mix for $.99.  Yes, less than a dollar – I had to snag it up knowing that I had to make Rob some funfetti cookies!

To be honest, though these cookies are a staple in my family – I’ve never actually made them.  Maybe it’s because once I started baking I tried to stick to baking from scratch, or maybe it’s because they’re not “new” to me so I didn’t see the point in baking them when I knew that I’d have them the next Christmas.  Regardless, I’m glad I finally decided to make them because with the little one on the way it’s good to learn some super quick, easy, kid pleasing desserts.  Though baking from scratch isn’t hard in my opinion, it does require a little extra prep that I may not have time for in a few years when I just want to bake with my kids!

Being that I never made these, I actually had to search for the recipe.  It wasn’t hard to find, but then when I went to open the box I noticed the recipe was right on the side of the box.  Oops!  There really is nothing easier than these cookies and I’m sure one day I’ll look around for a homemade version – but until then these will definitely work.  They’re so delicious – they taste like they’re completely from scratch – no one has to know you need only 1 bowl, 1 spoon and 4 ingredients!

Funfetti Cookies
Ingredients:
1 box Pillsbury Funfetti cake mix
1/3 cup oil
2 eggs
1/2 can Pillsbury Funfetti frosting, or frosting of your choice (a great way to seasonalize the cookies!)

Directions:
Preheat oven to 375

In a large bowl combine cake mix, eggs and oil until thoroughly moistened.  Add candy sprinkles from box and fold in well.

Shape dough in to 1-inch balls and place two inches apart on an ungreased baking sheet.  Take a glass and lightly press cookies to 1/4″ thickness.

Bake for 6-8 minutes or until edges are just golden brown.   Cool 1-minute then remove from pan and place on cooling rack.

Spread frosting over warm cookies and immediately sprinkle with candy from frosting, or with desired decorations.

Source: Pillsbury

Cookies and Cream Cupcakes for Super Bowl

6 Feb

Super Bowl is one game that brings everyone in America together.  Whether your’re a football fan or not you’ve most likely watched a Super Bowl in the past, if not making an annual tradition with friends and family.  While I’m more of a hockey or baseball girl I do enjoy watching football games with friends and family, especially the Super Bowl!  In fact, one of the most memorable football watching experiences in my life was Super Bowl XLI (2007) – Colts v. Bears.  I have no allegiance to either of those teams (though I do love Peyton Manning so I was rooting for Indianapolis!) I will always remember watching the game in Riviera Maya, Mexico with my then new husband on our Honeymoon!  It was such a great experience to watch with complete strangers and see how the resort outdoor auditorium was segregated in to Bears fans and Colts fans.

One of the things about Super Bowl that brings everyone together, regardless if you’re rooting for opposing teams, is the food!  There is something about game day food that makes everyone happy!  Chili, Wings, Pizza, Potato Skins, Nachos, Salsa, etc.  The list goes on and on, but I always ensure that I bring a dessert every year for Super Bowl, regardless of where I’m going.  This is one night of the year that there is never too much food!

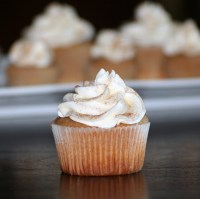
After reviewing my list of cupcakes I need to try I decided on Cookies & Cream cupcakes. I love Oreos, and my friends love Oreo Truffles so I thought this way I could do both!  I sampled one a little bit ago, and let me tell you that these cupcakes will definitely please my friends.  Not to mention, these may be my new favorite cupcakes, tied only to the Snickerdoodle cupcakes.  Not only are these everything you expect in Cookies & Cream, how do you not love an Oreo Truffle as garnish?!

I decorated the cupcakes to support both teams, and though I don’t have an allegiance to either team this year – ever since high school I’ve been a Green Bay fan thanks to pre-scandal Brett Favre.  So, this year I’m letting it known that I am team Green Bay.  Go Pack :)!

Cookies & Cream Cupcakes
Ingredients:
For the cupcakes:
24 Oreo halves, with cream filling attached
2¼ cups all-purpose flour
1 tsp. baking powder
½ tsp. salt
8 tbsp. unsalted butter, at room temperature
1 2/3 cup sugar
3 large egg whites, at room temperature
2 tsp. vanilla extract
1 cup milk
20 Oreo cookies, coarsely chopped (I quarter them)

For the frosting:
8 oz. cream cheese, at room temperature
6 tbsp. unsalted butter, at room temperature
1 tbsp. vanilla extract
4 cups confectioners’ sugar, sifted
2 tbsp. heavy cream

For garnish:
Oreo cookie crumbs
24 Oreo Truffles, or Oreo Cookie halves

Directions:
Preheat the oven to 350˚ F.  Line the wells of two cupcake pans with 24 paper liners.  Place an Oreo halve in the bottom of each liner, cream side up.  In a medium bowl, combine the flour, baking powder and salt; stir together with a fork to blend and set aside.  In the bowl of an electric mixer, combine the butter and sugar and beat together on medium-high speed until light and fluffy, about 2 minutes.  Blend in the egg whites one at a time, beating well after each addition.  Blend in the vanilla extract.  With the mixer on low speed, beat in half of the dry ingredients just until incorporated.  Add the milk and beat just until combined, then mix in the remaining dry ingredients.  Gently fold in the chopped Oreos with a rubber spatula until evenly incorporated, being careful not to over-mix.

Evenly divide the batter between the prepared cupcake liners.  Bake for 18-20 minutes, rotating the pans halfway through baking, until a toothpick inserted in the center comes out clean.  Allow to cool in the pans 5-10 minutes, then transfer to a wire rack to cool completely.

To make the frosting, combine the cream cheese and butter in the bowl of an electric mixer and beat on medium-high speed until smooth, about 1 minute.  Blend in the vanilla extract.  Beat in the confectioners’ sugar until incorporated and smooth, 1-2 minutes.  Add the heavy cream to the bowl and beat on medium-low speed just until incorporated, then increase the speed to medium-high and whip for 4 minutes until light and fluffy, scraping down the sides of the bowl as needed.

Frost the cooled cupcakes as desired.  Sprinkle with Oreo crumbs and garnish with Oreo halves or truffles.

Source: Annie’s Eats and Beantown Baker

Homemade Taco Seasoning

21 Jan

I previously posted about how every year I try to take better advantage of time, store sales, etc. to prepare some meals in advance to either stock the freezer or make the rest of the week easier, however why stop with the perishables?!  One of my favorite pantry staples is definitely taco seasoning, and I finally got rid of all the prepackaged taco seasoning in our pantry and made my own.  It takes less than 5 minutes to make up a big batch of homemade taco seasoning so I don’t know why it took me so long, but now that I have I’ll never buy another packet again!

Sometimes I’m a little nervous to try something homemade when it’s always delicious from a box, packet, etc. because the flavor just isn’t the same, however there was no need to be nervous about this!  Not only is it not full of preservatives, it’s still full of flavor!  Seriously, make a batch of this and you won’t regret it!  Keep it in the pantry and you’ll be one step closer to having a quick meal ready to go!

Homemade Taco Seasoning
Ingredients:
4 tbsp. chili powder
3 tbsp. plus 1 tsp. paprika
3 tbsp. ground cumin
1 tbsp. plus 2 tsp. onion powder
1 tsp. garlic powder
¼ tsp. cayenne pepper

Directions:
Combine all ingredients in a bowl, and mix well to blend.  Store in an airtight container until ready to use.

To prepare taco meat, use about 3 – 3 1/2 heaping tablespoons in place of a package of taco seasoning (cook approximately 1 lb. of beef or chicken, add 1 cup of water with the seasoning, and simmer until the liquid is almost completely gone.)

Source: seen on Annie’s Eats

(edited March 2011 to reflect more accurate measurements for seasoning per 1 lb. of cooked meat)

Classic Chicken Noodle Soup

19 Jan

At the start of every year I resolve to start utilizing my weekends to prepare foods for the week, or to stock the freezer, and this year is no exception, especially with baby on board.  However, this year I have more realistic expectations for myself – I know I won’t spend 1 day a weekend, or even every weekend doing this, so why set myself up to break my resolution in 2 weeks?!  Basically I just want to be less lazy on the weekends and actually think ahead and prep when I get home from the store, take advantage of crappy weather to make a few freezer meals, etc.

When menu planning for the week I had to think of where to start with my resolution.  Well, I am sick of leftovers for lunch and have been wanting Chicken Noodle Soup so why not start there?  I like the recipe I’ve used in the past, but it’s just been missing something.  When searching on foodgawker I saw a fantastic looking picture from Smells Like Home that turned out to be a Barefoot Contessa recipe so I knew I couldn’t go wrong.

This recipe was everything I love about Chicken Noodle Soup, except it was homemade!  I love lots of celery and carrots in my soup, and by using all white meat chicken and whole grain noodles I made it even healthier!  The best part though was that it was quick and it freezes well!  The soup makes a great workday lunch, or companion to a grilled sandwich.

Classic Chicken Noodle Soup
Ingredients:
2 Tbsp. Olive Oil
1 1/2 cup medium-diced celery (3 stalks)
1 1/2 cup medium-diced carrots (4-5 carrots)
1/2 teaspoon Kosher salt
1/2 teaspoon freshly ground black pepper
2 Quarts chicken stock
3 cups wide egg noodles
3 cups cooked chicken, diced
1/4 cup chopped fresh parsley

Directions:
Heat oil in a large pot over medium-high heat.  Add the celery, carrots, salt and pepper and cook for 10-12 minutes until softened.

Pour in the stock, bring to a boil over high heat, and add the noodles.  Cook the noodles for 10 minutes, then add the chicken and parsley.  Allow the chicken to heat through.  Serve hot.

Source: Smells like Home, originally adapted from Ina Garten, Barefoot Contessa Family Style