Archive | main course RSS feed for this section

Chicken Cordon Bleu Risotto

29 Nov
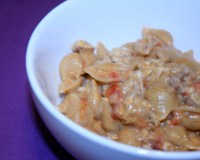
One of my favorite dishes is Chicken Cordon Bleu, and I know I’ve often commented on how I like to make Chicken Cordon Bleu inspired dishes.  One of my most recent recreations was this Chicken Cordon Bleu Risotto.  I love creamy risottos so it was no surprise that I loved this dish.  This dish takes a relatively basic risotto recipe and adds the flavors of Chicken Cordon Bleu (chicken, ham, Swiss cheese and the rich crunchy topping) to the final touches.  
If you’re interested in some of my other Chicken Cordon Bleu inspired dishes, check out:
Chicken Cordon Bleu Risotto
Ingredients:
1 Cup Risotto
3 Cups Chicken Broth
1 clove garlic, finely diced
1/4 onion, finely chopped
2 Tablespoons Olive Oil
1 Tablespoon Butter
1/2 cup dry white wine
1 1/2 cups shredded chicken
3 oz. cooked ham, diced
1/2 cup Swiss cheese, shredded
S&P to taste

For Topping:
1 slice high-quality white sandwich bread (without crusts), torn into quarters
2 Tablespoons unsalted butter
3/4 cup grated Parmesan cheese
1 Tablespoon chopped fresh basil

Directions

Warm up broth in sauce pan and keep at a low simmer until ready to use
Heat butter and oil in skillet/sautee pan over medium heat, adding chopped garlic and onion to cook for about 2 minutes, stirring occasionally
Add dry rice to pan with garlic and onions, coating with Butter and Garlic, stirring occasionally until rice begins to lightly brown, about 2 minutes.

Add wine to rice, stir and cook until it becomes absorbed.  

Add 1 cup of warm broth and stir periodically until rice absorbs most of the liquid.  Add another cup of broth, and continue until broth is gone and rice is creamy.
Add cheese and stir in until melted.  Add chicken and ham and cook until heated through.  

Meanwhile, to make topping:
Process the bread in a food processor (you should have about 1 cup crumbs).

Melt butter in a large skillet over medium heat. Stir in the breadcrumbs and cook, tossing often, until golden brown, 3-5 minutes. Transfer to a small bowl and toss with 1/4 cup Parmesan and the chopped basil.

Chicken and Stuffing Casserole

14 Sep
You may, or may not recognize this dish from a post way back in the day on this blog, however I’ve adapted it a bit and wanted to post my new version.  This is one of my favorite comfort food meals.  In the past I’ve always made it using convenience foods, which is still fantastic, however making it from scratch only takes a few extra minutes and is much more rewarding.  

Chicken and Stuffing Casserole

Ingredients:
1 lb. boneless/skinless chicken breasts, pounded to even thickness and cut into 1″ cubes, or 1 lb. shredded cooked chicken
2 Tablespoons butter
2 cloves garlic, chopped
2 Tablespoons flour
1 cup warm chicken broth
1/2 cup warm milk
8 oz. Sour Cream
1-2 cups thawed frozen vegetables of choice
1/2 cup shredded cheese.  I use cheddar but Swiss would be amazing if my husband liked it!
2 cups stale bread cubes
2 teaspoons desired herbs (such as parsley, sage and thyme)
Directions
Preheat oven to 350 degrees F and prepare a casserole dish with cooking spray.
In a medium saucepan, melt butter over medium heat.  Add in garlic and cook until fragrant.  Stir in flour and cook until slightly golden brown.  Slowly whisk in milk and 1/2 cup broth.  Simmer until it reaches a light boil and begins to thicken a bit.  Stir in sour cream, chicken, vegetables and cheese.  Add mixture to prepared casserole dish.
In a separate bowl, combine bread cubes, remaining broth (should be 1/2 cup) and seasonings as desired.  Place on top of casserole mixture.  
Bake uncovered for 30-45 minutes until chicken is cooked through (if using raw chicken), or until heated through and bubbling if using cooked chicken.
Source: Adapted from a friends mother

Burrito Bowl

29 Aug

As I recently mentioned in my Cilantro Lime Rice post, I love Qdoba and Chipotle.  When I go there, I always order the same thing – a Burrito Bowl, or Naked Burrito, consisting of: Rice, Meat and Cheese.  As plain and simple as it is, I cannot get enough of it and often crave it.  Whatever meat I chose all depends on my mood, but it’s usually Grilled Chicken or Shredded Beef.  Eventually I will find a shredded beef recipe that I will want to use to make these at home, but until then I stick with a simply marinated grilled chicken – the marinade usually consisting of a little EVOO, Lime Juice, a bit of tequila, some garlic, chili powder and jalapeño… delicious!

While this isn’t much of a recipe, I still wanted to post, for anyone that loves burrito bowls like I do.  They’re so easy to make at home with your own modifications.  Just because I like mine plain, as you can tell from the picture, doesn’t mean you can’t go all out!

Burrito Bowls
Ingredients:
Cilantro Lime Rice
Favorite Burrito accompaniments, such as Grilled Chicken, Beans, Cheese, etc.

Directions: 
Fill a bowl with desired amount of rice and top with burrito classics and then cheese and other burrito toppings.

Cornflake Chicken Tenders

28 Jun

I am constantly telling myself that I need to prepare more freezer friendly meals – but you can only freeze so many pasta dishes, right?!  Now, I love a good classic lasagna  and recently discovered that Rigatoni with Turkey Bolognese might be better when defrosted, but I like variety.  Joelen recently did a post about preparing her freezer for when she brought her new son home, and has loads of freezer recipes to inspire me! In fact, forget inspiration for now – I flat out copied this one verbatim, but will say that I do plan on getting a little more creative when I have time to devote to filling my freezer with meals.  I love the idea of being able to ask my husband to just throw something in from the freezer if I’m running late – or even myself just having something to back up on in the instance that, again, I’m running late, or just don’t want to think about it.

These chicken tenders were so easy that I wished I’d bought two packages of chicken from the store.  I would love to have a few bags of these little guys in the freezer because even the most novice of chefs can throw them on a rack over a pan and bake – no defrosting needed!

Cornflake Chicken Tenders
Ingredients:
1 1/4 lbs. b/s chicken breast tenders, or 4 b/s chicken breasts, cut into 1-inch strips
1/4 cup flour
1 teaspoon garlic powder
1 teaspoon onion powder
1/2 teaspoon salt
1/4 teaspoon freshly ground black pepper
1 stick butter, melted
2 cups finely crush corn flakes cereal
Directions:
Adjust an oven rack to the middle position and heat to 400 degrees.  Place an oven safe cooling rack on a baking sheet and set aside.
Combine the flour and spices in a small bowl; set aside.  Place melted butter in another small bowl; set aside.  Place the crushed cereal in rimmed shallow plate or bowl.  
Dip the chicken piece in the flour, then butter, then cereal.  Place the coated chicken strips on the rack on the baking sheet.  
Bake the coated chicken pieces in the preheated oven 20-25 minutes, until chicken is no longer pink.  
* To freeze – prepare as directed to coat the chicken and spread them on a wax paper lined baking sheet after coating.  Place in the freezer, uncovered, and flash freeze about 30-45 minutes, until mostly firm.  Transfer the strips to a freezer bag labeled with the cooking instructions.  When ready to prepare – preheat oven to 400 degrees and bake frozen for 25 minutes on the baking sheet with the cooling rack.  
Source: adapted from Joelen’s Culinary Adventures

Creamy Taco Mac

24 Jun

We definitely have a soft spot for Hamburger Helper in our house.  Cheeseburger Macaroni is probably one of my husbands favorite meals – so much so that if he were ever knowingly given the need for a last meal he might actually consider it.  I, too, enjoy Hamburger Helper but considering my love of cooking, desire in expanding my knowledge and wanting to cut out process foods when possible, I try not to rely on boxed meals too much.   Don’t get me wrong – I still love Hamburger Helper and I’m not gonna lie, I’ll probably continue to make it every once in a while, but this Creamy Taco Mac will definitely rein supreme when it comes to quick “box” dinners.  The concept is reminiscent of classic Hamburger Helper – but I know every single item that was in the skillet.  Can’t beat that, right?  Plus, it was just as quick which is an added bonus.   It makes a lot so I did freeze the leftovers – I’m hoping it’s just as good defrosted because I’m already craving it!


Creamy Taco Mac
Ingredients:
1 1/4 lb. ground meat (I used 1 lb. ground turkey, 1/4 lb. ground beef as that’s what I had)
8 oz. dry pasta + 1 cup reserved pasta water
1 can (14.5 oz.) petite diced tomatoes
4 Tbsp. mild taco seasoning
3 oz. cream cheese
1/2 cup sour cream
S & P
Cheddar Cheese to taste

Directions:
Bring a large pot of salted water to boil and cook pasta per directions.  Drain, reserving 1 cup of the pasta water.

Over medium heat, brown meat until no longer pink.  Drain and add taco seasoning and diced tomatoes.  Allow to simmer over low heat for 5 minutes.  Add cooked pasta, reserved water, cream cheese and sour cream.  Stir until cheese and cream is incorporated and melted.  Simmer over low heat about 3 minutes.  Season with S & P as desired.  Top off with desired amount of cheddar cheese.

Source: adapted from Delish 

Grilled Pizza

10 Jun

Memorial Day has come and it’s official that summer is in full force!  Though I’m the first to admit I’m not a fan of heat and humidity (so why do I live in St. Louis?!), I am a fan of a summer atmosphere.  BBQs, cold beer, Cardinals games, etc.  I am definitely not a master griller, but without a doubt my favorite thing to grill is pizza.  When I mention to people that we’re going to grill pizza they look at me like I have a second head or something.  But, man-oh-man, I could eat grilled pizza every day!
Though it seems hard to do, and time consuming, based on the instructions below, believe me – it’s not.  You can make it even easier too by using a store-bought dough!  I’ve been on a homemade pizza kick lately because I think it’s so easy when you allow yourself enough time, but the convenience factor of store-bought just can’t be beat, especially now that so many grocery stores are really stepping up their prepared foods.  
There are a few different ways to grill a pizza.  You can grill on a pizza stone, directly on the rack, or like I recently did when entertaining – on the rack using par-baked dough.  I like grilling directly on the rack so that I get beautiful grill marks, but whatever floats your boat will work!


Grilled Pizza 
FOR THE DOUGH – 
Ingredients:
2 c. all purpose flour
1 tsp instant yeast  (or 2 1/4 if making day-of)
1/2 tsp salt
1 tsp honey 
3/4 c. water, 105-110 degrees 
scant 1/4 c. good quality olive oil 

Directions:
In bowl of a stand mixer fitted with the dough hook, add flour, yeast and salt. (If you forgot to make the dough the night before, use 2 1/4 tsp instant yeast here).  Turn mixer on low and while running add honey and water.
Slowly add olive oil until dough just comes together around the hook (will still be lots of “pieces” of dough around the work bowl).  Turn mixer off and turn all dough out onto counter.


Using hands, pull dough together with a few throws against the counter (Dough should be very supple in texture, not oily or dry. Depending on temperature, humidity, etc you may need a 1/2 tsp or so more water or flour. Add it now if needed).  Knead for about a minute to create a ball of dough.  


Place dough into large gallon-sized Ziploc bag and place in fridge overnight. (If you forgot to make the dough the night before, place bag in warm spot for at least 1 hour)


Remove dough from fridge and place on counter to come to room temperature.


If making personal 8-10 inch pizzas, divide dough into 4 equal pieces.  Using either a pizza peel, or parchment paper sprinkled lightly with cornmeal, shape the dough using lightly floured hands.  


IF GRILLING PIZZA ON A STONE – 

Place large, grill-safe, pizza stone directly on the grill, heating over medium-high heat for 30 minutes.


Top your pizza with your favorite sauce, toppings and cheese.    Transfer your pizza to the heated stone.  If you’re using parchment paper, make sure to slide a cutting board or non-rimmed cookie sheet, underneath for added support.  


Bake until edges of dough are golden and cheese is melted, about 10 minutes, tops.  Remove with a pizza peel or cutting board and allow to sit for about 3 minutes before cutting.


IF GRILLING PIZZA DIRECTLY ON THE RACK – 
Heat the grill to medium heat and while warming, prepare everything you need (baking sheet of pizza dough rounds – I recommend more “personal” size pizzas if grilling directly on the grate – sauce, cheese and toppings).


Place the pizzas directly on the grill, allowing the dough to cook with a closed grill for about 5-8 minutes, depending on thickness.  Flip the dough and top the cooked side with sauce, toppings and cheese.  Close the lid and cook another 5-8 minutes, or until the bottom is grilled and the cheese is melted.  


IF GRILLING PAR-BAKED CRUST DIRECTLY ON THE RACK – 
Place large pizza stone on the lowest oven rack position and heat at 450 degrees for 30 minutes. Transfer dough to the pizza stone using the pizza peel or parchment topped thick surface.  Bake about 5 minutes until dough is starting to set.  Remove par-baked dough to a pizza peel or cookie sheet to take out to your grill.  


Place the pizzas directly on the grill heated to medium, allowing the dough to cook with a closed grill for about 4-5 minutes, depending on thickness.  Flip the dough and top the cooked side with sauce, toppings and cheese.  Close the lid and cook another 4-5 minutes, or until the bottom is grilled and the cheese is melted.  


Source: Pizza Dough – adapted from  Good Things Catered

Classic Beef Lasagna

8 Jun
A good, classic lasagna recipe is something every good Italian woman can make with her eyes closed, but it’s something that everyone should have available when they want to serve a crowd, or eat for a week.  Though time consuming, lasagna is easy when you’re prepared and impressive to serve which is why they’re great for entertaining.  You can assemble in advance and bake when it’s needed while preparing the rest of your meal (a nice big salad, bread or rolls and a freshly opened bottle of wine!)  I personally like to prepare Lasagna on Sundays and then bake on Monday while I’m working out.
Some of you may recognize this recipe from a few years ago on this site, however I’ve tweaked it a little and have a MUCH better picture to share.  Unfortunately Lasagna is not the easiest thing to photograph unless you make it like a gazillion layers to give it some height!

Classic Beef Lasagna
Ingredients
1 box No Boil lasagna or 16 cooked Lasagna sheets
1 ½ lbs lean ground beef
~ 3 cups favorite Italian Cheese blend, shredded (I like to use a blend with mozzarella, provolone, fontina)
½ c. Parmesan Cheese
1 (15oz) container Ricotta
2 eggs
~ 5 cups marinara sauce (store bought or
homemade)


Preparation
Brown meat and drain.  Simmer in sauce while preparing the cheese mixture.


In a separate medium bowl, beat eggs and mix in Ricotta, Parmesan cheese and ~ 1/2 cup cheese blend.  Set aside for assembly.


Assembly
Spread 1 cup sauce mixture on bottom of prepared 9×13 baking dish.

Layer 4 lasagna sheets, slightly over lapping.  Spread 1/3 cheese mixture on the noodles.  Top with 1 cup sauce mixture then 1/2 cup shredded cheese.


Repeat until out of noodles (3 layers total) then top with remaining sauce and shredded cheese.

Cover with foil and bake at 375 for 40 minutes.  Remove the foil and continue baking for about 15 more minutes or until lasanga is bubbling and cheese on top is melted and beginning to bubble.


Allow to sit about 5-10 minutes before cutting and serving.

Champagne Risotto with Chicken

6 Jun

Risotto is a dish that many people are intimidated to make on their own, and I admit I used to be one of those many people.  I do love Risotto though, but rarely get it when I go out because there’s usually something about the recipe that I know I won’t like (lots of mushrooms, shrimp, etc…) so I don’t even bother.  Since I love it I was inclined to try my hand at it, fully prepared to fail.  I know, talk about a fantastic attitude, right?!  (said in a sarcastic voice).

Well, ye a little faith!  The first time I made it, I was hooked on homemade Risotto and knew I’d never be afraid of it again.  I have many Risotto recipes that I want to try, but I see Risotto as more of a “have every once in awhile” kind of dish.  It’s easy enough to make all the time but I’m afraid it’ll lose it’s appeal.  Not sure why, but hey – it gives me something to look forward too, right?!

I decided to try this recipe (or combination of two essentially) because I had some champagne sitting around.  One of the original recipes called for the risotto with Scallops, but I’m not a seafood fan, and I couldn’t pass this up so I subbed the scallops for chicken.  If you’re a scallop fan I’d definitely imagine this would be a great meal since champagne and scallops go so well together (so I’ve heard!)

I added cream and it made the Risotto so luxurious.  This would make a great special occasion meal with a nice chicken, steak or fish side (without the chicken mixed in obviously.)

Champagne Risotto with Chicken

Ingredients:
2 Tablespoons butter
1 shallot, finely chopped
1 clove garlic, minced
3/4 cup arborio rice, or medium-grain white rice
1 cup dry champagne
2 1/2 cups low-sodium chicken broth
1/2 – 3/4 pound chopped grilled chicken
1 Tablespoon heavy cream
1/4 cup fresh grated Parmesan cheese
S & P to taste

Directions:
In a medium saucepan, bring the chicken broth to a boil, reduce heat and simmer.

In a large skillet, melt butter over medium heat.  Add the shallot and cook until tender, about 2-3 minutes.  Toss the garlic in with the onion about 1 minute in to the cooking to so it doesn’t burn.  Add the rice and stir to coat in the butter.  Continue roasting the rice, stirring constantly, about 2 minutes.

Add champagne and simmer until most of the liquid evaporates, about 2 minutes.

Add 1/2 cup of the broth and stir until almost completely absorbed by the rice, about 2 minutes.

Continue cooking the rice, adding broth 1/2 cup at a time, stirring constantly and allowing each addition of broth to absorb before adding the next, until the rice is tender but still al dente (firm to the bite).  About 20 minutes total.  Remove from heat.

Gently stir in heavy cream, cooked chicken, Parmesan and S & P to taste.

Source: adapted from Epicurious and Giada De Laurentiis

Baked Mac & Cheese

4 Jun


There is only so much you can say about Macaroni and Cheese.  It’s pasta and it’s cheese – what’s not to love?!  I’ve generally preferred stove-top mac & cheese to baked, but I definitely see where baked mac & cheese has it’s place.  It’s great to entertain with because you can make it in advance earlier in the day, or even the night before, and pop it in the oven before serving.  


When looking for a baked mac & cheese recipe that would be creamy enough to prepare in advance, I stumbled across this recipe on Pioneer Woman.  I’ve never met a recipe of hers that I didn’t fall in love with, so I knew this had to be tried as well.  I prepared this recipe earlier in the day and several hours later after baking it was still creamy and flavorful.  Definitely a winner!  Plus, with this recipe can even be enjoyed before baking.  However, I did notice when taste testing that the mustard flavor was pretty powerful before baking, so if I do make this recipe in plans of serving straight from the stove-top, I’ll reduce the amount of dry mustard to suit my personal preferences.


Baked Mac & Cheese

Ingredients:
4 cups Dried Macaroni
1 whole Egg Beaten
¼ cups (1/2 Stick Or 4 Tablespoons) Butter
¼ cups All-purpose Flour
2-½ cups Whole Milk
2 teaspoons Dry Mustard
1 pound Cheese, Grated (I used 3 Cheddars – Sharp, White and Mild)
½ teaspoons Salt
½ teaspoons Seasoned Salt
½ teaspoons Ground Black Pepper
¼ – ½ teaspoons of any optional spices such as: Cayenne Pepper, Paprika, Thyme, Onion Powder, Garlic Powder

Directions:
Preheat the oven to 350 degrees.  Cook macaroni according to package directions until slightly firm.  Drain and set aside.

In a large pot, melt the butter over medium-low heat.  Whisk in the flour and cook the mixture for five minutes, whisking constantly and being careful not to burn.  Add the milk to the pot, stir in the dry mustard, and whisk until smooth.  Cook the mixture for five minutes until very thick.  Reduce the heat to low. 
In a small bowl, beat the egg.  Take 1/4 cup of the warm sauce and slowly pour it into the beaten egg, whisking constantly to avoid scrambling the egg.  Whisk until smooth.  Pour the tempered egg mixture back into the sauce, whisking constantly.  Stir until smooth.  Mix in the cheese, reserving about half a cup for topping, and stir until completely melted.  Add in seasonings.  Taste and adjust seasonings accordingly.  Add the drained cooked macaroni to the pot and mix well.
Pour the mixture into a baking dish, top with reserved cheese, and bake for 20-25 minutes or until golden and bubbly on top.
Note – if you prepare it in advance you might want to cover with foil and bake 30-40 minutes, removing the foil at about 20 minutes so it doesn’t dry out.

Baked Rigatoni with Turkey Bolognese Sauce

30 Apr


I really enjoy rich baked pastas, but my waistline does not so much.  When making them at home you can easily adjust a recipe to make it a little more figure-friendly.  Granted, a baked pasta will never be considered “good for you” you can still make subtle adjustments here and there without sacrificing too much flavor.  


Bolognese sauces seem like a sauce that just scream “Bake Me” to me for some reason.  I think because they’re so rich and hearty.  With this Bolognese sauce I replaced the ground beef with heart healthier ground turkey.  I also used skim milk instead of whole, or even 2%, as well as 2% cheese.  Just a few small steps can make a difference.  Also, I prefer to pair this sauce with sturdier pastas, such as rigatoni.  It seems to hold up better, and I love that you get more great sauce with each bite when it makes its way in to the tube of the noodle!

Baked Rigatoni with Turkey Bolognese SauceIngredients: 3 Tablespoons Olive Oil
½ cup Grated Carrots
1/2 Large Red Onion, Diced
1 pound Ground Turkey
1 Tablespoons Dried Oregano
1 Tablespoons Dried Basil Flakes
1 tablespoon Tomato Paste
2-3 cloves Garlic, Minced
1/2 cup Red Wine
a few dashes of Worcestershire
1 cans (28 Ounce) Whole Tomatoes
1/2 cup Milk (I used skim)
Salt And Pepper, to taste
1 lb. rigatoni
1 cup Mozarella Cheese, shredded


Instructions: Heat oil in a large Dutch oven or skillet over medium heat. Add grated carrots and onions and cook for a few minutes. Make a well in the center of the mixture, and then add in the ground turkey. Cook for a few minutes until no longer pink, gradually stirring it into the carrot mixture.

Throw in oregano and basil. When the meat is browned and combined with other ingredients, make another well. Add tomato paste and let it heat. Add garlic and stir to combine.

Make a well in the center of the mixture and add red wine. Stir together. Add Worcestershire and stir. Add canned tomatoes. Finally, pour in milk, stir, and let simmer for 30 minutes to 2 hours—however long you need.

While simmering, boil rigatoni as directed on the package.  Drain and add to the simmering sauce, combining sauce and noodles gently.

Transfer pasta to a 9×13 casserole dish, spreading evenly.  Top with shredded mozzarella and bake in a 350 degree oven for 30 minutes or until bubbly and cheese is melted.
(I like to separate the pasta in 2 or 3 casserole dishes so that I can freeze some for later.  No need to bake before freezing)
Source: Adapted from
Pioneer Woman